A Foolproof Recipe for Quick and Easy Homemade Cheese Cracker Dog Treats from Scratch Using Your Stand Mixer!
Hi! If you’ve been following me for long you’ll already know this, but for those who are new, welcome to Far From The Farm. I’m Mona, the Brit behind the recipes, learning life and food in the States while sharing our debt-free journey and what’s on the menu in our home today!
There are a few areas of spending that don’t look like a problem until you actually stop and add them up.
Dog treats were one of those for us.
It was never anything dramatic. Just a bag in the cart here, something a bit different there, maybe picking up a “better” option because she’s part of the family after all. It felt normal.
But once I actually sat down and looked properly, we were spending somewhere between $30 and $50 a month on treats alone.
And yes, she’s loved, she’s spoiled, and that’s not changing. But when you’re working through baby step 2 and trying to be intentional with every dollar, that kind of spending starts to stand out. Especially when it’s something you could very easily make yourself!
Around the same time, I kept seeing those viral videos of homemade crackers. Goldfish, Cheez-It style, all made from really simple ingredients.

I thought if they can make snacks that bougie from just a few simple ingredients then perhaps I could alter the recipes to make them safe for our sweet pup!
So I started testing a few batches. Keeping it simple. Whole wheat flour, real cheddar cheese because he’s completely obsessed with it, a small pinch of salt, and just enough cold water to bring it together.
What came out of the oven were these little cheesy crackers for dogs that couldn’t be easier to make.
They’re crunchy, full of real ingredients, and they last us about two weeks from one batch.
More importantly, it means one less thing we’re repeatedly buying without thinking.
As a military family working through baby step 2 of our debt free journey, swaps like this make a real difference over time. You’re not cutting things out. You’re just doing them differently.
Spending less, stretching what you have, and still taking care of the things and people you love, pets included.
And just a reminder that if you’re struggling and you need help with managing your budget or starting your own debt free journey then here’s some FREE resources below you may find helpful!
living frugally and fully
free tips and resources to make the most of what you have
As always, these photos are from my real kitchen here in our sweet military base home. No AI recipe images or staged lighting or spotless marble counters. Just real life and real food made in a small space. Proof that you can feed your family well without needing a dream kitchen or fancy tools!
So head into the kitchen with me and let’s make a batch of these simple cheesy crackers that your dog is going to go mad for!

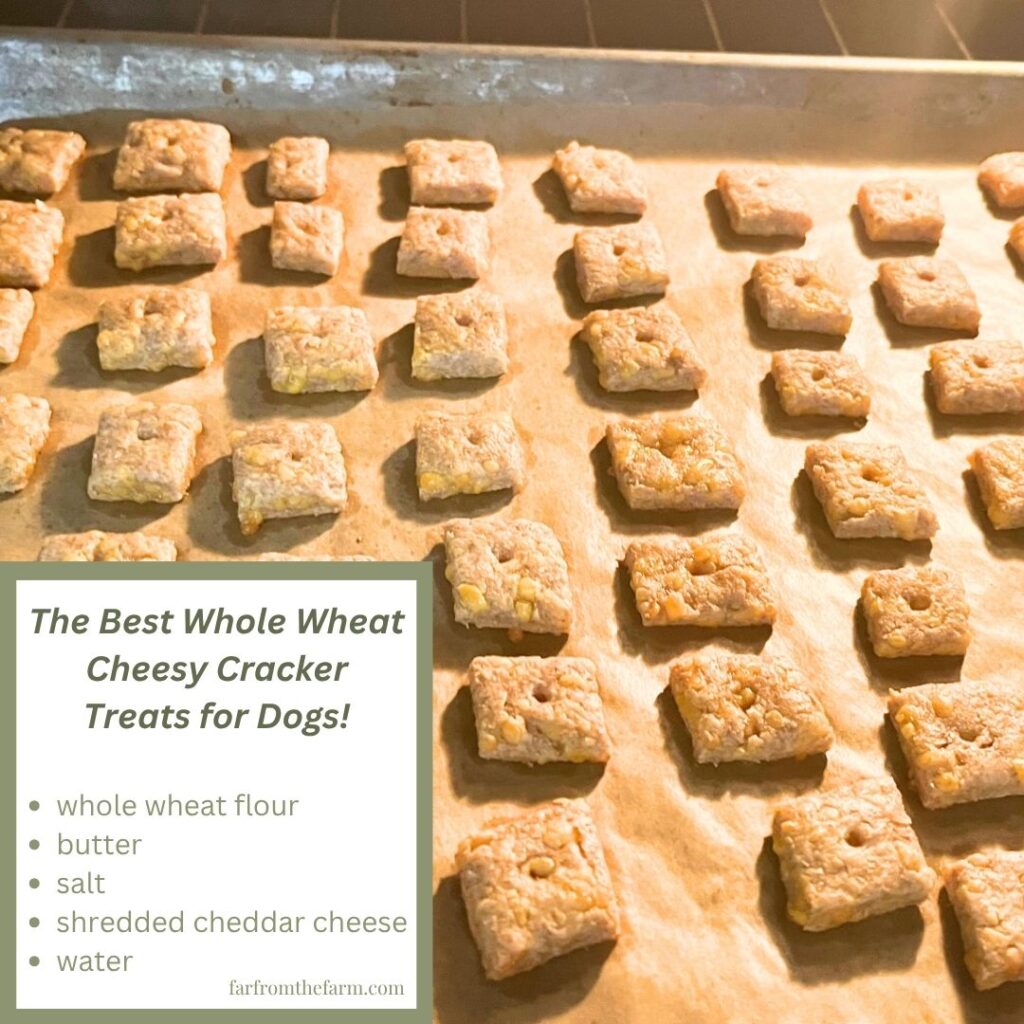
Sneak Peak!
Sometimes you need to see the end product before you commit to making it, right?! So here’s a quick glimpse of how it turned out for me today!
Equipment
- Stand mixer with dough hook (KitchenAid or similar)
- Measuring cups and spoons
- Spatula
- Silicone baking mat
- Rolling pin
- Bench scraper
- Pizza cutter or sharp knife
- Cookie sheet
- Parchment paper
- Chopstick
Available on Amazon.com [ad]


Ingredients
Yield: Makes 1 large batch of approx 120 little cracker-sized dog treats
- 2 cups whole wheat flour
- 4 tbsp unsalted butter, softened or melted
- 1 to 2 cups shredded cheddar cheese
- Pinch of salt (no more than 1 tsp)
- 5 to 6 tbsp ice cold water
Step-by-Step Instructions
Step One: Mix the dough
Add the whole wheat flour, butter, shredded cheddar, salt, and cold water to the bowl of your stand mixer.
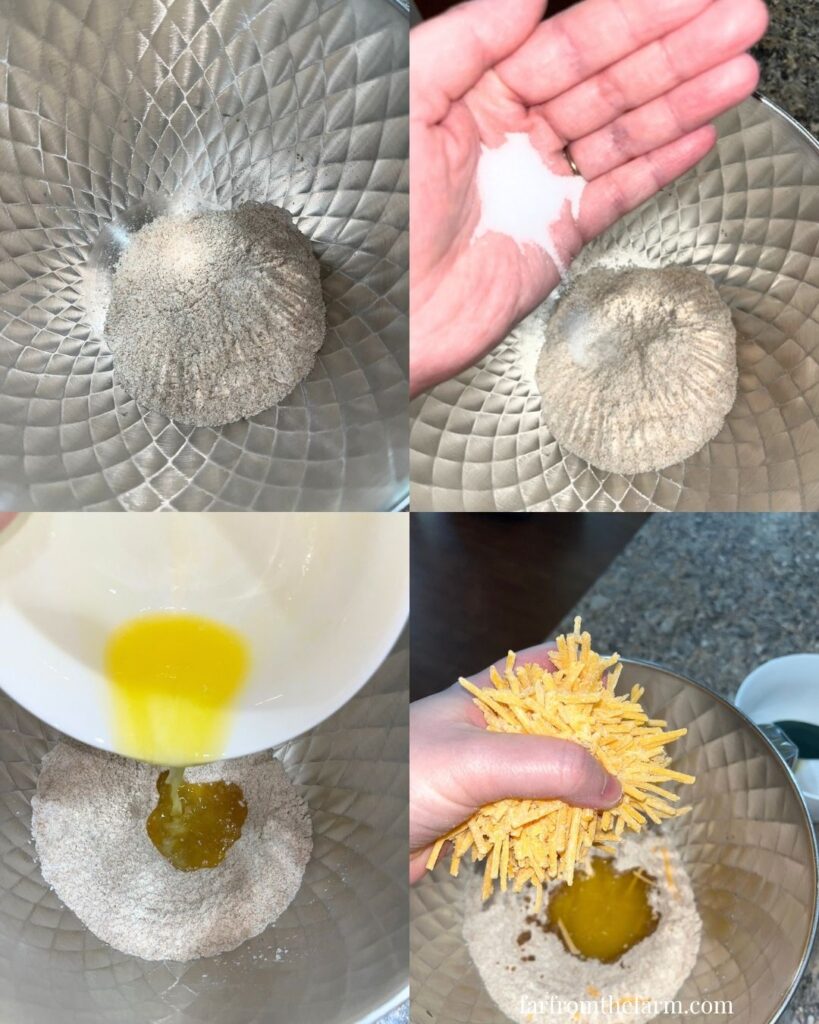
Using the dough hook, mix for 2 to 3 minutes, scraping down the bowl as needed.
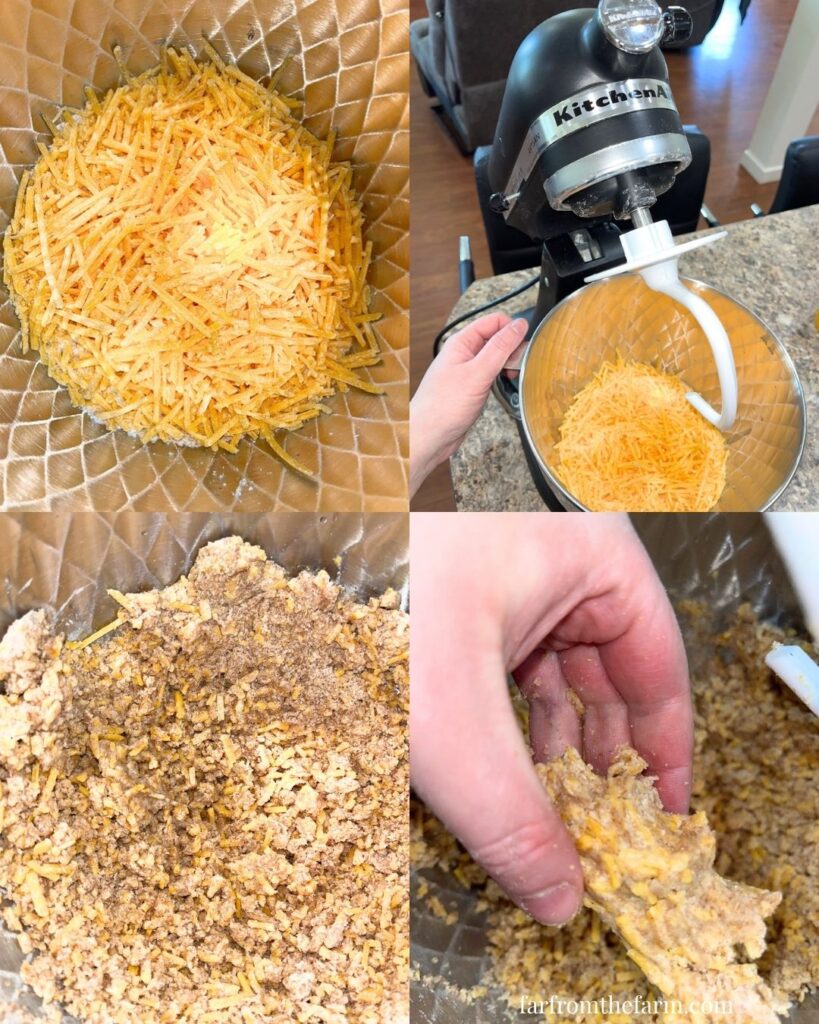
It will look crumbly at first, but that’s completely normal.
Step Two: Bring it together
Tip the mixture onto a silicone baking mat.
Press it together with your hands. It should come together into a dough when pressed, even if it still looks a little rough.
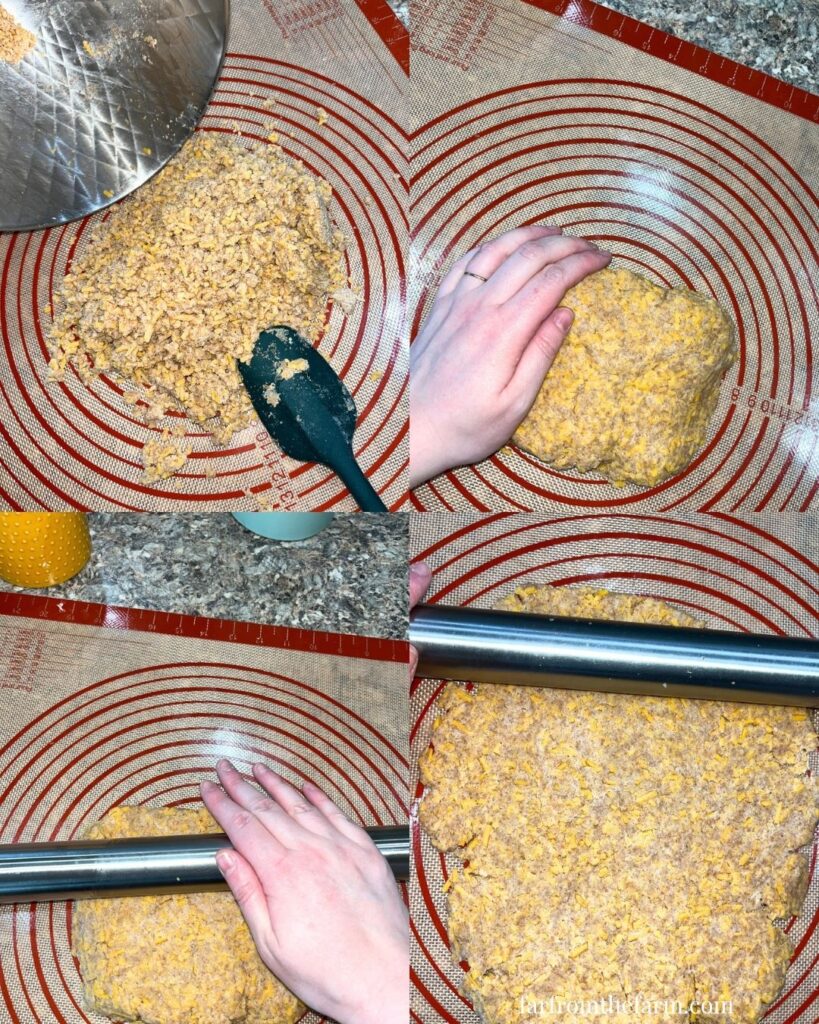
Step Three: Roll it out
Roll the dough out to about 1/4 inch to 1/8 inch thick, depending on how thick and substantial you want your treats to be.
Thinner gives you crunchier treats. Slightly thicker gives a softer bite.
No need to flour the surface, which keeps things nice and simple.
Step Four: Cut into squares
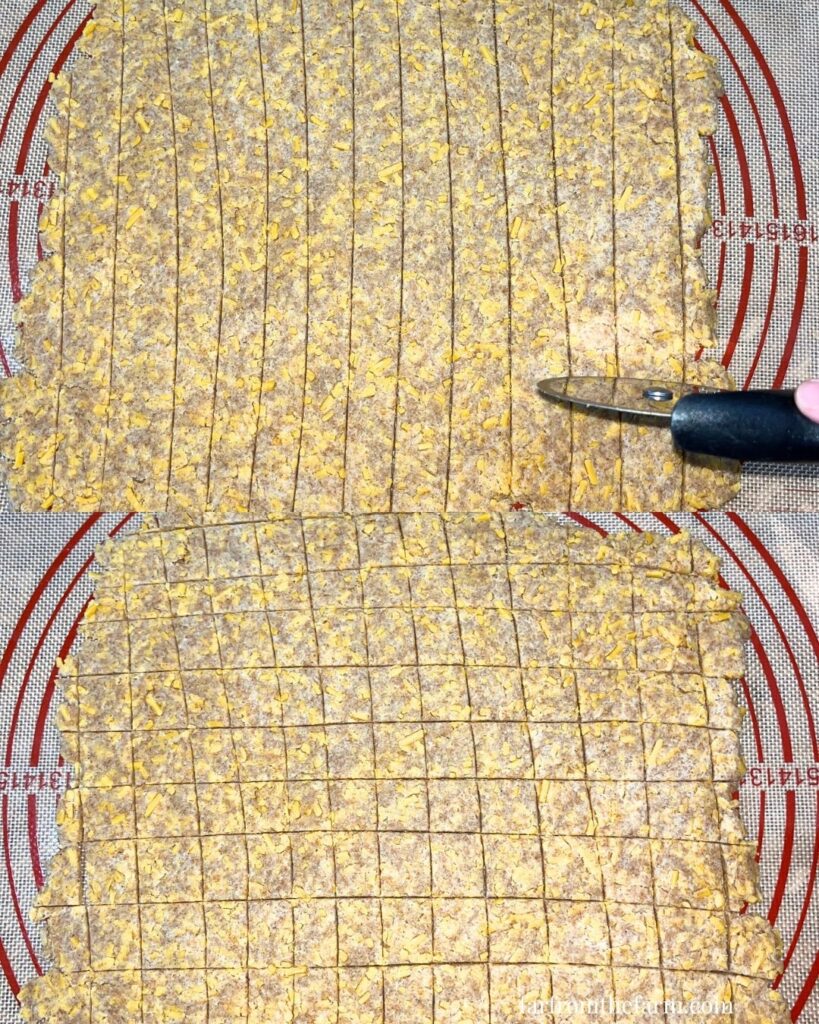
Using a pizza cutter or knife, cut into small rough squares.
They do not need to be perfect. Slightly uneven makes them look more homemade.
Step Five: Transfer to tray
Using a bench scraper, carefully transfer the crackers onto a parchment-lined baking sheet.
The dough can be a bit delicate at this stage, so this makes it much easier to move them without breaking.
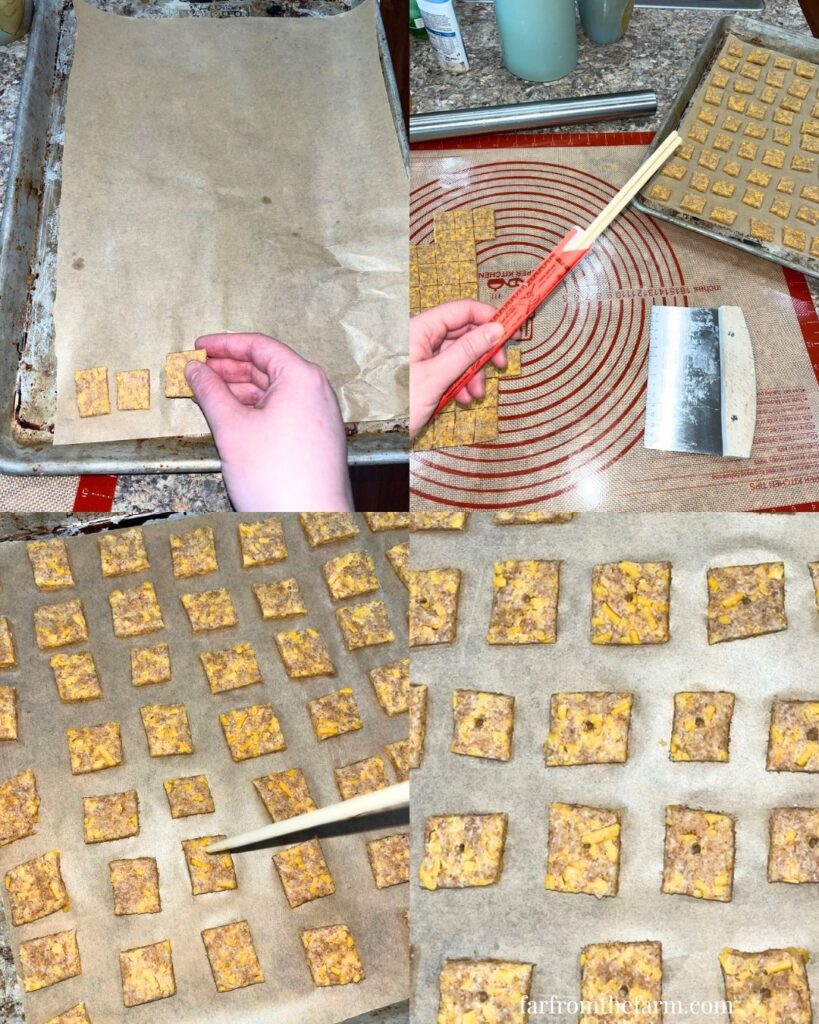
Step Six: Add the signature hole
Take a clean chopstick and press a small hole into the center of each cracker.
This helps stop them puffing up and gives that classic cracker look.
Step Seven: Bake
Bake in a preheated oven at 350°F for about 10-15 minutes (depends on the size you’ve cut them) until they’re lightly golden and firm.
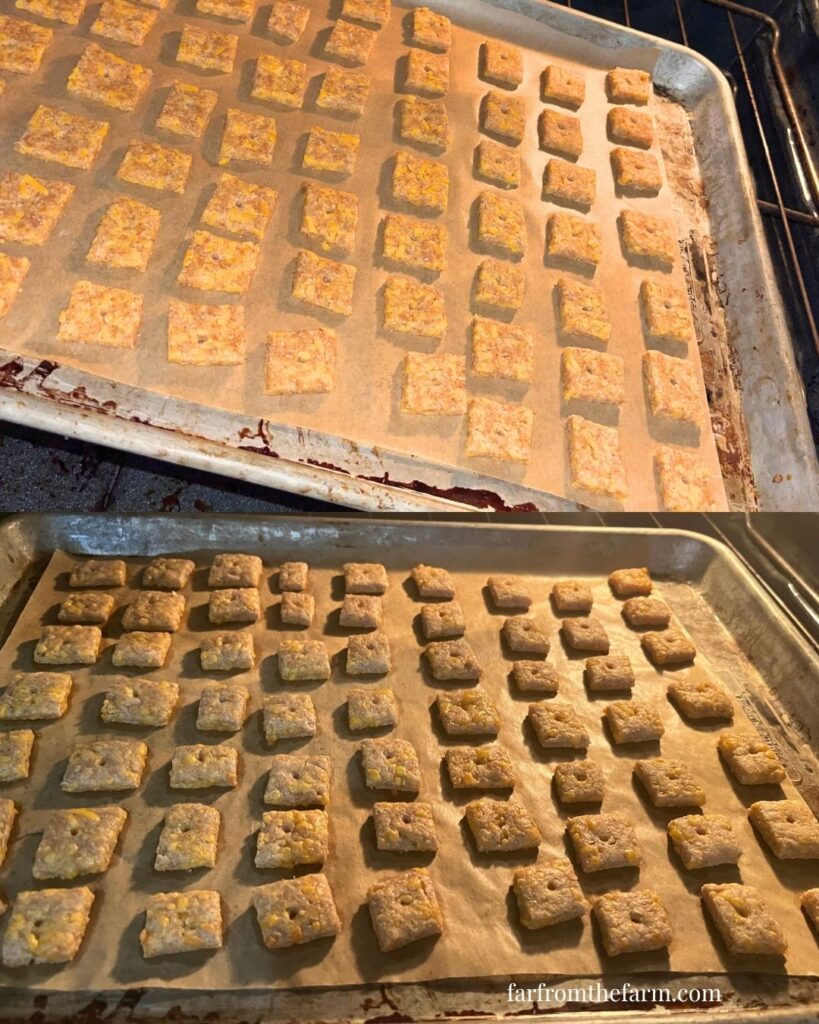
Step Eight: Cool
Allow the crackers to cool completely on a rack.
They will firm up more as they cool.
Step Nine: Store
Store in an airtight container once fully cooled.
They will keep well for around 1 to 2 weeks.
Notes and Troubleshooting
Notes
- Whole wheat flour keeps these a bit more suitable for dogs
- The cheese is what binds everything together
- Use closer to 2 cups of cheese if your dog is a cheese lover
- Rolling thinner will give a crunchier result
Troubleshooting
- Too crumbly? Press it together firmly or add a tiny splash more water
- Too soft after baking? Roll thinner next time or bake a couple minutes longer
- Browning too quickly? Rotate the tray halfway through
- Not holding shape? Use the bench scraper to transfer more gently
Storage
- Store in an airtight container at room temperature for up to 2 weeks.
- Make sure they are fully cooled before storing to prevent moisture.
Serving Ideas
- Use as training treats
- Break into smaller pieces for portion control
- Add to your dog’s enrichment toys
- Great as a little daily reward
Why You’ll Love This Recipe!
- Simple real ingredients
- Budget friendly alternative to store treats
- Quick and easy to make
- Lasts around two weeks
- Perfect for dogs who love cheese
- A practical swap that actually saves money
FAQ
Can I use regular flour instead of whole wheat?
Yes, but whole wheat is a better option for dogs.
Can I freeze these?
You can, but they are quick enough to make fresh in small batches.
How long do they last?
Around 1 to 2 weeks in an airtight container.
Can I make them smaller?
Yes, just cut into smaller pieces for training treats.

The Best Whole Wheat Cheesy Cracker Treats for Dogs!
Ingredients
Equipment
Method
- Add the whole wheat flour, butter, shredded cheddar, salt, and cold water to a stand mixer. Mix with a dough hook for 2 to 3 minutes, scraping down as needed until a crumbly dough forms.
- Tip the mixture onto a silicone mat and press it together with your hands until it holds into a rough dough.
- Roll the dough out to about 1/4 inch to 1/8 inch thick.
- Cut into small squares using a pizza cutter or knife.
- Carefully transfer the squares to a parchment-lined baking sheet using a bench scraper, spacing slightly apart.
- Press a small hole into the center of each square using a chopstick to stop them puffing up too much while baking.
- Bake in a preheated 350°F oven for 10 to 15 minutes, depending on size, until lightly golden and firm.
- Transfer to a cooling rack and allow to cool completely so they crisp up fully.
- Store in an airtight container once cooled.
Video
Notes
- Whole wheat flour keeps these a bit more suitable for dogs
- The cheese is what binds everything together
- Use closer to 2 cups of cheese if your dog is a cheese lover
- Rolling thinner will give a crunchier result
Storage
- Store in an airtight container at room temperature for up to 2 weeks.
- Make sure they are fully cooled before storing to prevent moisture.
Related Recipes
- Check out all our easy Pet Recipes!
Nutrition information is automatically calculated, so should only be used as an approximation.
The Takeaway
Making. homemade dog treats is one of those small changes that just makes sense.
You’re still treating your dog. You’re still giving them something they love. But you’re doing it in a way that costs less, uses real ingredients, and fits into your bigger goals!
What to Try Next?!


Share & Rate This Recipe!
If you tried this recipe, please share your feedback with a quick star rating or comment below. And if you loved it, don’t forget to share it with friends and family too!
Last update on 2026-07-30 / Affiliate links / Images from Amazon Product Advertising API